To get started synchronising data from Orderwise to HubSpot, follow these steps:
1. Install OW Sync - Orderwise Connector from the official installation flow.
- You will be asked to select your HubSpot account of choice, we recommend first testing the integration on a test account before deploying to production.
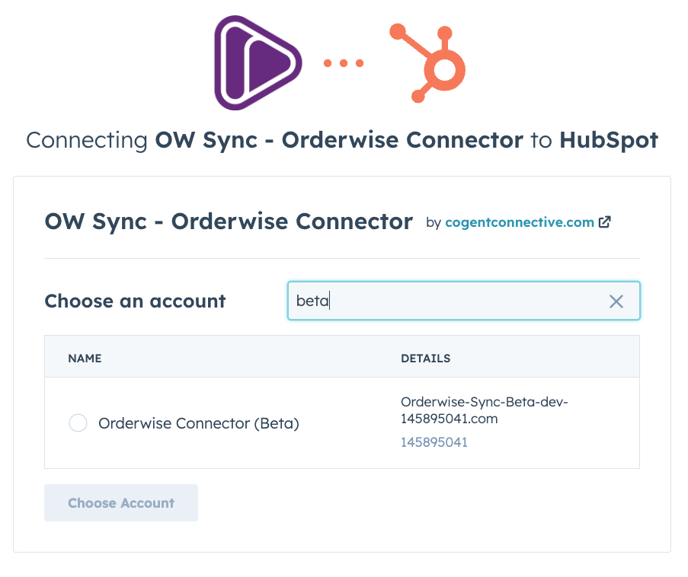
- Enter the license key provided to you by the Cogent Connective team.

- Enter your Orderwise credentials (Host URL, Username, Password): they are stored safely and encrypted to ensure your data privacy.

- Now, you are ready to set up your initial sync. Select the Orderwise data you want to carry over to HubSpot and any exclusion fields for records you want to exclude from the sync. We can help you set this up optimally as part of your onboarding fee.

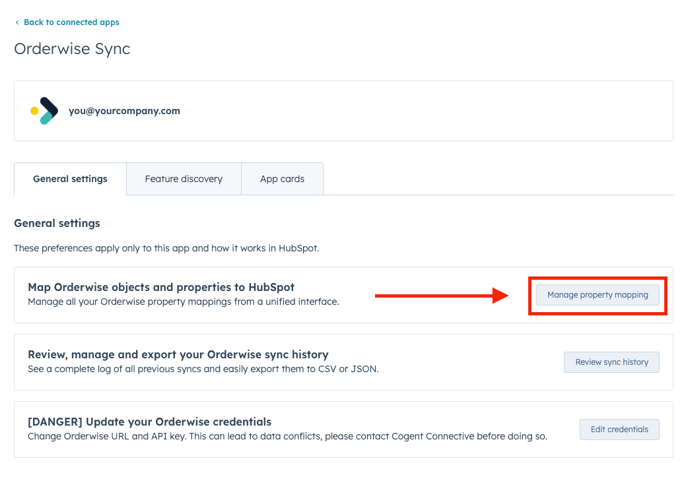
- At the end of the onboarding, you will be redirected to the settings screen, where you can begin to map your Orderwise fields to HubSpot properties.
- Once you're redirected to the settings, you are now able to open the mapping interface which is embedded directly within HubSpot (no need for external UIs!).
- In this view, you are presented with 2 options: "Standard Objects" and "Export Definitions". We'll start with Standard Objects.

- Currently, only Customers can be synced from Orderwise to HubSpot, but this will change soon as we continue developing sync tools for Customer Contacts, Products, Sales Orders, Invoices, and other relevant objects available in your ERP.
- Click on the dropdown arrow on the left to review all Customer properties available from the Orderwise API and how they map to HubSpot

- You will see that each dropdown is divided into 3 parts: "Required Properties", "Standard Properties", and "Custom Properties".

- These headers are meant to simplify your data integration experience, making it easy to immediately map properties which are required and/or standard across both systems (e.g. statementName to name for company names).
- In the dropdown, you can find the Orderwise field name on the left, followed by the data type for that mapping, the data flow (two-way or one-way), the matching HubSpot property, and a checkbox to activate the mapping.
- You have complete control over what properties you want to map from one system to the other: you can map all, some, or do everything custom.
- Click on the dropdown arrow on the left to review all Customer properties available from the Orderwise API and how they map to HubSpot
3. To start mapping your columns, enable the Customers <> Companies sync and start selecting the mappings you are interested in. No records will be sent over from Orderwise until you've selected at least 1 mapping from either standard or custom properties.
- To enable the sync, simply click on the toggle under "Enabled".

- If successful, you will see a message in the top-right corner.
- Open the dropdown again; you will notice that the selection checkboxes under "Standard Properties" and the dropdowns under "Custom Properties" are now available to use ("Required Properties" are greyed out as they're mandatory).
- To start syncing data from Orderwise quickly, you can click on "Select all", to the right of the "Standard Properties" section to activate the sync.

- You can also select your preferred mappings individually if you do not wish to map all the standard properties to HubSpot.
- At this point, you can expect Orderwise to synchronize with HubSpot every 60 minutes. This will be reflected in the sync history, which we'll discuss now.
4. Exit the previous window, and click on "Review sync history".

- Here, you will be able to review a table of synchronisation logs for clarity on what has been synchronised, at what time, against which object types, and so on.

- For your own reporting purposes, you can export detailed logs with create, update, delete, and error counts for each of the previous synchronisations.
- Please note: This table may be empty the first time you load it as the system prepares for the first data migration in the background. It should populate within 60 minutes of activating your first synchronization (it's not real time).
- If you want to export specific logs to your computer, you can select the rows of interest to you and click on either "Export as CSV" or "Export as JSON".

- This will provide you with either a spreadsheet view of your data for manual analysis or a JSON file for developers to debug previous syncs.
- You also have the option to request a bulk export once per week. This will take longer to process, especially if you've been using OW Sync for many months. For this reason, the files are delivered via e-mail as soon as they're processed in the backend

5. Now that you know how to review your previous synchronisation logs, let's go back to the object mapping interface to learn about custom property mapping.
- Under "Custom Properties", you will find all Orderwise fields which do NOT map directly back to existing HubSpot properties. You may choose to either map these fields to any custom property you've added to your HubSpot account or ignore them.

- Each custom property offers a dropdown with all the available HubSpot properties for that specific data type. You cannot select any checkbox in this section until you've mapped the Orderwise field to the HubSpot property of your choice.
- For demonstration purposes, we have created a custom "VAT" property in HubSpot, tied directly to Companies, which is the object in question.
- After clicking on the corresponding dropdown, we can search directly for the custom property to speed the mapping process.

- Once we're confident that we've found the right property, we simply click on it, and it becomes linked to the Orderwise "vatNumber" field.

- This gives us the ability to activate the synchronization between two properties just like we did for the "Standard Properties" section previously.

- As soon as the checkbox is selected, OW Sync will start integrating that data both ways. Important: This will work retroactively as well, so any record linked to Orderwise that already exists in HubSpot will sync VAT numbers.
- Working with standard objects in OW Sync is fairly straightforward. Simply select the checkboxes you are interested in and the system will do the rest!
- Note: While only "Customers" are available right now, the experience of synchronising other native Orderwise objects with HubSpot will be exactly the same.
6. Moving on to "Export Definitions" in the top tab interface, this is a more advanced topic which allows you to integrate ANY data you want from Orderwise. There is no limit here as export definitions are based on SQL that connects directly to your Orderwise database.

- Important: If you've never used export definitions in Orderwise before or have little acquaintance with them, you can ignore this section or contact us for support. Based on your needs, we will create relevant export definitions in your Orderwise instance and connect them back to OW Sync to map your custom data with HubSpot.
- When you first load the "Export Definitions" tab, you will be presented with a "New Definition" screen which asks you to add a new Orderwise export definition.
- This is the first step towards loading your custom data into HubSpot.
- Select the target HubSpot object you want to load data into (currently only Companies are available but more will be released soon)

- Then, based on your current setup in Orderwise, you will be able to find "API export definitions" under the eCommerce module. For full guidance on how to create export definitions, please refer back to their documentation.

- Once your export definitions are ready, copy the export definition ID (auto-incrementing number starting from 1) into the "Definition ID" input. This is the most important step in order to fetch the right information from Orderwise.

- Finally, give your export definition a name for reference purposes.

- Once all 3 fields are completed, the "Preview definition" button will become available and you may load the data directly from Orderwise.
- Note: Depending on the complexity of your SQL query and data volume, it may take a few seconds to load the table preview.

- Check whether the columns are coming back correctly, and if the data is accurate. You'll get 10 rows to ensure that everything looks as intended.
- If the preview doesn't work or the data isn't correct, you may cancel and change export definition ID or modify the SQL in Orderwise.
- If the preview looks good, click on "Add definition".
- Note: Depending on the complexity of your SQL query and data volume, it may take a few seconds to load the table preview.
- At this point, you will have your first export definition available under "Saved Definitions". Click on it to reveal the full list.

- For demonstration purposes, we have added a second definition to show the difference. One has ID of 17 and the other ID of 18. As you'll see on this screen, we cannot enable syncs prior to mapping the fields.

- Our next step is to click on "Edit mapping" to start mapping your custom export definition keys to any HubSpot property.
- For demonstration purposes, we have added a second definition to show the difference. One has ID of 17 and the other ID of 18. As you'll see on this screen, we cannot enable syncs prior to mapping the fields.
- Once clicked, you will be presented with the following pop-up:

- This is a very similar experience when compared to the "Custom Properties" dropdown mapping you've done in step #5.
- The only difference here is that, out of the many "keys" you see on the left (which can be either standard Orderwise fields or hidden data retrieved from the database), you must identify and map a unique value property in order for the synchronisation to work effectively.
- Important: If you don't select a unique value ID to map back to HubSpot (e.g. Orderwise ID for customers), the synchronisations will not be able to keep track of changes across both systems, potentially leading to duplicates and reporting issues.
- To select the unique value property, set up your SQL in the export definition to expose the ID of the object you're interested in (in our case customers) and map it back to the relevant HubSpot property.

- You can see that unique value properties from HubSpot are marked with a key icon, ensuring you're selecting the correct option.
- Once you've identified the unique key, you can map the rest of the keys to any company property (the mappings below are not representative of real-world use, you'd likely have custom properties set up for them).

- Finally, click on "Save mappings" to store them in the database.
- Once the mappings are saved, the "Enable" toggle will become available; select it and your export definition will start syncing automatically.

- Important: Export definition syncs are an extremely powerful concept, but they can run into a few issues if not configured correctly. If you're unsure on how to leverage them, we're happy to help.
- If you don't need an export definition anymore, simply select "Delete" and you'll be presented with a confirmation pop-up.

- Select the target HubSpot object you want to load data into (currently only Companies are available but more will be released soon)
- This is the first step towards loading your custom data into HubSpot.
7. In case you ever need to change your Orderwise credentials, you can do so in the last section of OW Sync's settings screen by clicking on "Edit credentials".

- This will open a screen that's very similar to the onboarding experience, where you can adjust your Orderwise URL, username, and password.

- You can also test your sync to check that everything is working correctly.

And that's it!
We will continue updating this guide every month with new functionality, object types, and synchronisation options.
If you're curious about the latest features available for OW Sync - Orderwise Connector, check out our dedicated landing page and HubSpot marketplace listing.
If you have any questions or doubts that aren't covered by this guide, please feel free to reach out directly to us. We are more than happy to help you navigate OW Sync!